Many anglers practice catch and release when they’re out fishing. It’s becoming more popular to do so, and even encouraged with certain species of fish. However, you have to be careful when practicing catch and release. Although this practice is intended to keep the fish you catch alive, sometimes, if an angler isn’t careful, the fish could die still.
In today’s post we’ll explain both why anglers perform it and how to practice catch and release properly!
Why Anglers Practice Catch and Release
Catch and release is a conservation practice that was developed to prevent fish from being over-harvested. Sports fishers have been practicing catch and release for a long time since most don’t need to keep their fish for food. The fun is typically in the fight and the resulting catch. Catch and release is used when there’s no need to keep a fish. If you’re not planning on eating your catch, it might be best to practice catch and release.
How to Practice Catch and Release Without Harming the Fish
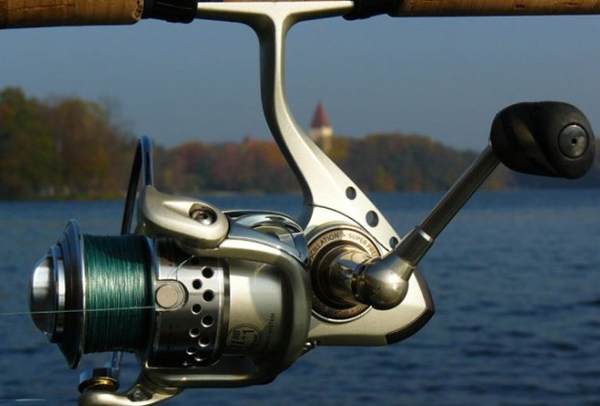
Make sure you plan ahead before you go fishing. Even if you aren’t expecting to practice catch and release, it might be a good idea to come prepared anyways. Make sure to bring release/dehooking tools with you in your tacklebox. And keep appropriate tackle in your tacklebox. Use tackle that’s matched to the species you’re trying to catch. Also, try to use barbless hooks. Fish are more easily unhooked from hooks without barbs, making it easier for you to help them get off the hook. Another type of hook that would work well are circle hooks which hook fish in the mouth, allowing them to be easily released.
After you catch the fish, make sure you minimize the handling of the fish. The less touching the better. Although if you do touch the fish, wet your hands first thing, to help maintain the fish’s slime coat. Otherwise, the fish can get an infection since the slime coat is a layer of protection for the fish. Make sure to avoid touching the fish’s eyes and gills! And if you want to take a picture with your fish, try to hold it horizontally rather than vertically in order to prevent any issues. Lastly, don’t drop the fish!
When you’re using a dehooking device to release fish, make sure to handle the fish carefully. If you don’t have a dehooking device at your disposal, needle nose pliers will also allow you to properly remove a hook. To use needle nose pliers to remove a hook, you’ll need to back the hook out the way it entered, delicately.
But what should you do if you want to release a fish that’s been deeply hooked? Sometimes fish are so deeply hooked that if you tried to remove the hook, they’ll be damaged. In those cases, the best thing to do for the fish is to cut the line as close to hook as you possibly can. Quite often, the hooks will fall out of the mouth or even dissolve once the fish is released into the water.
If the fish looks tired, possibly after a long fight with an angler, you may need to revive the fish before releasing it back into the water. This is especially true if it looks like it’s having problems swimming in the livewell. To do this, when you’re placing it back in the water, you will need to pass water over its gills. Then move the fish forward with its mouth open. If it doesn’t swim away after this, you’ll need to try to revive it again. Once the fish is swimming on its own that’s when you know it will be fine.
At Kona Fishing Charters, we want you to have a wonderful time fishing. We will help you practice catch and release if you wish to use it with any of the cool fish you catch with us. We encourage our guests to practice it with any blue marlins that they may catch, however, if you choose not to do so, we can donate the blue marlin to local, Hawaiian charities. If you’d like to book a trip for Marlin fishing in Kona, call us at (808) 960-1424. We’ll ensure you’ll have a good time!
When you come fishing with us on the Kona Fishing Charters, you’re probably going to want to take lots of pictures of you and your friends and family fishing, as well as all the fish you catch. But how can you take the best pictures while fishing? We compiled a list of easy tips to help your pictures turn out great!
How To take Better Pictures While Fishing – 7 Easy Tips
Understand Your Camera – Before taking any pictures, you should try to understand your camera. If you’re using a smartphone, this might be a simple task, however, if you’re using a digital camera, this might be a little harder. But, just remember, that you’re trying to figure out settings that work for fish photos. So play around with your camera and take mental notes of the features and settings on your camera. You could also look at your camera’s manual, which will probably show you some other features and settings you didn’t know about.
Focus on the Fish – When you do get out on the water and you’re ready to take pictures, make sure to focus on your subject – the fish! Don’t worry about getting everything in focus, just make sure the beautiful fish you caught is in focus. Even if the fish is the only subject in focus, that’ll just make it stand out more and make a great picture! But along with this tip, you should also remember not to keep the fish out of the water too long if you’re practicing catch and release.
Get up Close and Personal – If you’re using your camera’s zoom, be aware that you lose picture quality. So instead of using your zoom, try to get up close to your subject… the fish. If the fish (or any other subject) is really close to the camera, use the Macro setting on your camera in order to get the most detailed picture possible. Remember to take the picture above and/or below the fish to make the most appealing in the photo.
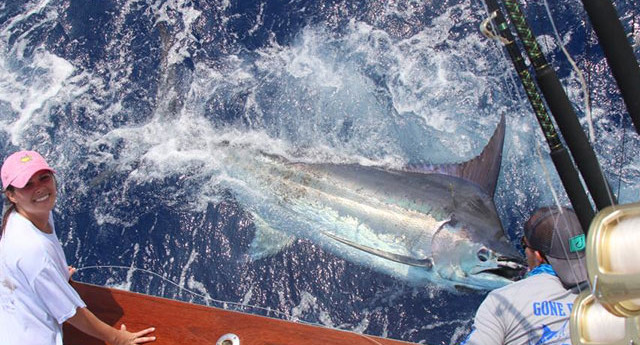
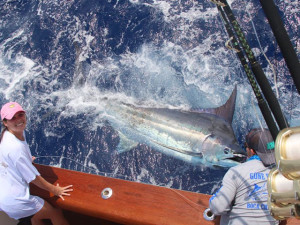
Take Pictures of the “Fight” – While most sportfishing pictures pick static images, like the boat, the fish, etc. the best shots are of the fight. Action shots are most exciting and will get the most “likes” when you share them with your friends and family. You can look through our galleries to see some of our own action shots.
Take more than One Shot – When you’re taking pictures don’t just take one shot. Take more photos than you would normally. Some cameras have a setting that allows you to take more than one shot even if you only click once. This is very important when dealing with action shots and hero shots. The more shots the better in those cases because there will be likelier that there will be a good shot in the batch. Erase the ones you don’t like afterwards and you’ll be good to go.
Be Steady and Slow – When you’re taking pictures, make sure to go slow and steady like the tortoise in the story of the tortoise and the hare. Take a breath before you shoot a picture, that will help you keep the camera steady and help you slow down. If you don’t do this oftentimes the camera moves during the photo, making the photo turn out blurry or fuzzy.
Pay Attention to the Light and the Sun – When you’re taking pictures, make sure to pay attention to the sun and the light. Keep the sun at your back when you’re taking pictures – colors are much more present and beautiful if the fish is in sunlight than in shadow. If you shoot with the sun at your front, everything will be covered in shadow. With this in mind, remember that there is “magic hour” in photography. These hours take place right after sunrise and right before sunset, and this allows the sun to paint everything with a beautiful, warm hue.
Now that you know these tips, you will be sure to have a delightful, fun time on the Kona Fishing Charters. You’ll be able to take beautiful fishing pictures of your friends, family, and yourself catching all sorts of awesome fish in the Kona sea. And, remember, that we can always take a picture of you if you need or want us to do so. We want you to have a fantastically wonderful time fishing with us on the Kona Fishing Charters and we want to make sure your pictures preserve the great memories you’ll have of this fishing trip.
Before you join us out on the beautiful Pacific Ocean, it’d be good to understand some basic boating terminology. Although, you don’t need to know this before you come out, you might have fun learning all of these definitions and words, especially since boating terminology can seem like a foreign language to some. It’ll be quite impressive if you come out on the boat using the terms like starboard and port correctly. We want you to have the best experience with us on Kona Fishing Charters, so we hope you have fun learning these terms. If you have any questions, we’ll be pleased to answer them when you join us on a deep sea fishing charter adventure.
Boating Terminology and Lingo
aft – at or near the back of the boat. When you are moving towards the rear end of the boat, this is called going “aft.”
aground – touching the bottom
ahead – refers to a boat moving in a forward direction.
alee – the side of a boat that’s away from the direction of the wind.
amidships – the central part of a boat
anchorage – a location used for anchoring
astern – refers to a boat moving in a backwards position (reverse).
backing down – a type of maneuver used in offshore fishing where you move the ship in reverse in order to catch a fish.
bail – to remove water with a pump or bucket.
bait station – the area on a fishing boat that’s dedicated for preparing bait.
baitwell – the compartment on a fishing boat that’s used to keep live bait.
ballast – extra weight carried on a boat to increase stability.
beam – the widest part of a boat.
bear off – to turn the boat away from the wind.
berth – a place to sleep on a boat like a bed or a couch.
bow – the forward section of the boat. (You can remember “bow” as the front, because when you take a bow, you’re leaning forward.)
buoy – an anchored object that floats in the water to alert boaters. It is used as a navigation aid.
cabin – a room for passengers and/or crew members to use.
cast off – to let go of a line.
charts – electronic or paper navigational maps.
chumming – placing fish parts in the water to attract gamefish.
cockpit – synonymous with bridge, this is where the ship is steered and controlled.
course – the intended direction.
draft – the maximum depth of a boat.
fathom – a nautical measurement – it’s equal to a depth of six feet.
fishfinder- an electronic device that can find and display fish on a monitor using sonar technology.
forward – when you are moving towards the front end of a boat, this called going “forward.”
galley – the kitchen on a boat.
hard over – pulling the steering wheel over all the way in one direction.
head – the bathroom/toilet on a boat.
helm – where operational controls are located on a boat.
hull – the main section of the boat.
knot – a measure of speed for nautical miles per hour. A nautical mile is slightly longer than a mile on land.
lifeline- lines on a boat deck that can be grabbed to prevent any overboard spills.
list – a boat’s leaning to one side.
port side – the entire left side of a boat as you are looking forward.
port bow – refers to the front left of a boat.
port quarter – refers to the rear left side of a boat.
starboard side – The entire right side of a boat as you are looking forward.
starboard bow – the front right of a boat
starboard quarter – refers to the rear right of a boat
stern – the back end of a boat.
topside – when you move from a lower deck of a boat to the upper deck of the boat.
underway – when a boat is moving, either by motor or wind, this is called being “underway.”
wake – the area of waves following a moving boat
Now that you’ve armed yourself with boating lingo, you will have an even better time with us on the Kona Fishing Charters. You’ll have fun using the lingo while boating and fishing in the Pacific Ocean. At Kona Fishing Charters, we want you to have a great time deep sea fishing, so if you have any questions, or are interested in more boating terms, let us know when you visit us. Call us at (808) 960-1424 to book your fishing charter in Kona, Hawaii!
If you’re new to fishing, you may not know the importance of fishing knots. But the knot is one of the most important parts of fishing – it’s the link between the angler and the fish. Not all knots can be used in all scenarios though. We have created a list of some of the best knots for different fishing scenarios and have explained how to make these knots so you have an easy time learning them. Even if you’re an advanced angler, you may learn a new knot that can help you catch fish.
Basic Fishing Knots
The Six-Turn San Diego Jam knot is a mouthful to say, but it’s a great knot to use when tying on a lure or a fly. The knot uses wraps around the tag end and the standing line allowing it to cushion itself. It’s also stronger than clinch knots, a more popular and traditional choice for lure and fly knots, because they only wrap one strand.
To do the Six-Turn San Diego Jam you’ll need to:
Thread the line. Make sure to do it through the hook’s eye, carefully, and then double it back around 10 inches.
Wrap the tag end over itself. After you do that, wrap it around the standing line. Do this seven times, slowly moving towards the hook.
You will then need to pass the tag end through the first open loop at the hook eye (the opposite end of the hook). You may need to use a finger to make it easier for yourself. Then you’ll need to thread the tag end through the open loop.
Lastly, you’ll pull the tag end tight, making sure the wraps don’t overlap.
The J knot is a great knot to use when you need to tie the leader to the line.
To use this knot you’ll need to:
Lay the leader and the line over top each other for several inches.
You’ll then form a loop by tying an overhand knot. Make sure that the leader line is pulled through the loop.
Run the end of the line and the leader through the backside of the loop.
Repeat all of this, from the top to the bottom.
Moisten the lines with water and pull.
The Rapala knot is a great knot for tying on a lure. It can be also used for fly fishing, if you need your fly to be of a freer movement. The wraps that are used in the Rapala knot relieve stress where the standing line enters, and the standing line is cushioned by the overhand knot.
To use a Rapala knot:
You’ll need to tie an overhand knot above the tag end of your line.
Thread the tag end through the lure and then again through the overhand knot.
Make around three wraps around the standing line then pass the tag end through the loop that was formed.
Moisten the line and tighten it.
The Uni knot is a great, dependable knot. It’s really useful for when you need to tie monofilament and/or fluorocarbon lines to lures.
It’s also very simple, you only need to do three things to complete it:
First, you’ll need to run the line through the hook eye to form a loop.
Turn that line five times around in the loop.
Moisten the line and pull it tight.
The Blood knot is a great knot for fly fishing. It’s mostly used when you need to join two lines of a similar size.
To do a blood knot:
You’ll need to overlap the two lines. Twist them around each other seven times.
Repeat the above step, but do it the other way, the same amount of times.
Finally, pull the lines in opposite directions (slowly). The knot will gather together.
Lastly, the Bimini Twist, which is also known as the Albright knot, is a great, versatile, reliable knot that is great to use when you need to tie two different types of lines together. It can also be used if the lines are of the same type but just different diameters.
You’ll need to start the knot by:
Making a loop in the heavier line. Run the lighter line through it.
Wrap the light line about ten times over itself and the heavier line’s loop.
The tag end should be fed through the loop.
Slide the wraps on the heavy line to the end of the loop and tighten the line.
Every fisherman has his favorite knots, and I’m sure you can learn plenty more knots if you come out with us on the Kona Fishing Charters boat when you come out to fish with us. Who knows, we might even learn some new knots from you. At Kona Fishing Charters, you will have tons of fun fishing with us. Call us at (808) 960-1424 to learn more about Kona fishing charters!
We at Kona Fishing Charters welcome children on to our charter boat when they’re accompanied by an adult. We’re excited to share the joy of angling with the younger generation, and it’s important that they’re having as much fun as their parents, especially when game fish are involved. If you’re struggling with getting your children involved in angling, these tips should be able to help you make fishing a fun adventure for any kid!
15 Ways to Make Fishing Fun for Any Kid
Consider the Age of the Child – If your child is younger, try not to make fishing the entire trip, they’ll likely get bored or lose patience. Allow some time to play outdoors, whether that’s swimming in the water, floating leaves, playing hide and seek – try to make it fun for your kid so they’ll want to come again.
Don’t Bring All the Kids – If you have a lot of children, or if your child has a lot of friends, it may be tempting to bring a lot of them out at once. You probably don’t want to do that. Too many children on a fishing trip makes it more likely that accidents will happen. It also lowers the children’s attention span since they’ll be easily distracted by their friends and/or siblings.
Check Your Basic Skills – Make sure you have tackle, make sure the fish is hooked properly. And while you do this, have your child pay attention to what you do. Show them your fishing tackle (and make sure not to bring out any expensive tackle while teaching your child). The simpler the tackle is, the easier it will be for your child.
Bring Along Extra Gear – Bring extra hats, clothing, sunscreen, and snacks/drinks. The snacks and drinks are very important if your child is younger than 10 (water especially). Don’t forget to bring insect repellant as well, you don’t want your child and yourself to be covered in bug bites. A first aid kit is also a good idea.
Teach your Child about the Fishing Laws and Regulation – Make sure you have the proper license and that you’re fishing legally. Take this time to tell your child about in season fishing and size/number limits for species.
Supervise Your Child – Keep an eye on your child or children at all times so they won’t get hurt.
Easy Bait – Use bait that’s easy for a child to use such as crickets or worms. Or artificial bait in case the child is squeamish.
Wear life preservers – Encourage a good habit by making sure to bring and wear life preservers if you’re fishing on a boat. And if your child is small or young, make sure that they’re wearing a life preserver if swimming or wading in the water at any time.
Small Hooks are the Way to Go – Try not to grab hooks that are larger than a size 10. Fish won’t want to grab a bigger hook. And not being able to catch a fish will disappoint your child.
The Lighter the Line the More Fun Your Child Will Have – The line should be light and easy for a child to use. Plus unless you’re going for bigger fish, a light line should work fine.
The Best Rod and Reel Combo – For kids, a light spinning rod and reel combo should work great. It’s a lot easier for kids to use.
Use A Bobber – Bobbers are entertaining for kids. The way the bobber bobs on the surface excites them and helps the child see and feel when a fish is caught on their hook.
Be Prepared to Leave Early – These sessions should be short if your child is young. It’s better to leave a little early, in order to build anticipation for the next time then leave too late.
Don’t forget to bring a camera with you! It’ll be important to look back at these memories one day and your kid(s) will have fun posing with the camera.
We hope that these tips help you and your child have a great time fishing anywhere. But we especially hope this inspires you to take your kid(s) out on the water with us at Kona Fishing Charters for the best Kona Hawaii fishing. There are lots of fish to catch and lots of fun to be had. Even if they don’t want to fish, they’ll be able to enjoy the waters of Hawaii and spy lots of cool animals and fish in the water. Call us at (808) 960-1424 to book your fishing trip with us at Kona Fishing Charters on the Pacific!
If you’re new to fishing, we will help you out when you come fishing with us. However, you may be interested in learning some things before you come out on the water with us. In this article, we’ll be tackling what to do if there aren’t any fish biting! There are many things you can do when the fish just aren’t biting. From changing lures to moving to a better spot, we believe that this article gives a good summary of what to do when the fish won’t bite. We hope you enjoy learning more about fishing in this article and that it will encourage you to come out to the beautiful Pacific with us!
TIDAL WATER MOVEMENT
Tides can definitely affect the way the fish are biting! On an outgoing tide, you can catch a lot of fish because they’re biting regularly. But if the tides change and the current stops, then so could your fishing “luck”.
That’s because the lack of a current can turn away fish and turn off biting. This can even happen in offshore fishing because there are still currents happening even if you don’t notice them. If you are working with a slack tide and no current that probably means no fish, which isn’t good for your chances. If you can, try moving to a different spot.
WEATHER
The weather conditions can definitely affect whether you catch a fish or not. If there’s an oncoming storm or low-pressure conditions, fish will often swarm and feed, allowing you to easily get bites if you’re in the right spot. This is because the water will be stirred and the fish will know that a storm is coming – a storm coming means it will be harder to feed. The water will be murkier than normal after the storm making it harder to find prey, so the fish will hunt for their food, allowing you to fish for them. However, if a cold front is passing through your area (check your weather channel), high pressure will also invade and the fish won’t be interested in your bait. You may have to move your boat around and change with the weather conditions of the water.
WARM TEMPERATURES
Warm temperatures attract fish and colder temperatures do not. During a cold front, surface water is severely impacted by the cold temperatures, making it less likely to find a lot of fish near the surface. The further down the water column you get, the warmer the water is, and that is where all the fish will be in the case of a cold front. However, even if there isn’t a cold front and you’re still not finding fish, you may want to try looking for a plant or factory, somewhere where warm water is pumped in. The fish will swarm the area and you should be able to catch fish there – just make sure you’re allowed to fish there before doing so.
CHANGING LURES
If none of the above works, or if you’re unable to do any of the above suggestions, then you may want to try changing your lure. Try using very natural looking lures that mimic live bait or perhaps even try to use live bait in order to convince the fish to bite. There is more information about lures in previous blog posts if you’re interested in learning more about lures.
More information about Lures
First, is your lure moving fast? If it is then you might want to adjust. Slow moving fish don’t want to deal with quick lures like the spinnerbait, they want something easy to catch. If you give them something easy to catch then you’ll probably catch them!
Slower fish also prefer larger prey rather than smaller prey. Chasing after larger prey costs them less energy than a school of little fish that may easily escape their attack.
You should also try to use live bait when you can. Or at least natural lures that look like live bait.
In negative conditions such as a cold front, those loud colors and rackets in lures won’t work as well when compared to natural lures. The fish have more time to examine the bait before they bite in negative fishing conditions. Natural looking bait is more likely to convince them to go for the bait.
What Else Can You Do When the Fish Won’t Bite?
If all of this fails, is there anything else you can try? There are actually a few other things you can do in order to catch a fish in negative fishing conditions. You can fish tight to cover. This is useful to do when many fish are burying themselves in the thickest cover they can find. They won’t move for very much and if you want to catch them you practically have to land your bait on their head. Cast into the thickest cover you can as the closer you get your bait to the fish the more likely you are to catch something.
We hope this guide helps you when the fish won’t bite! Now you’ll at least understand why this can happen to the best of anglers – sometimes the weather or temperature just doesn’t suit the fish. If you’d like to try out your luck and fish with us on the Kona Fishing Charters, call us at (808) 960-1424 to book your Kona fishing trip! We can guarantee you’ll have a blast no matter what!